A set of simple full body stretching exercises for beginners at home. Stretching for beginners at home: videos and exercises for all muscle groups Is it possible to do stretching?
In the article, you will find a lot of useful information regarding stretching.
Briefly, I will tell you: about the types of stretches (static / dynamic), what is the difference between them, their advantages / disadvantages (which is better for a beginner, etc.), I will touch on a very topical issue that interests many beginning guys/girls: “ how to do stretching correctly” (where to start, what to do, how to do it, etc., so as not to cause harm and waste time).
Well, and finally, I’ll tell you about a set of the best (effective) exercises for stretching all the muscles of the body (neck, trapezius, shoulders, arms (biceps, triceps), chest, back, and of course legs), of course talking about the technique of performing them , everything is detailed with pictures, in general, so that no unnecessary questions arise.

Everyone has their own goals, for example:
- do the splits;
- improve posture,
- improve muscle elasticity;
- develop coordination;
- acquire a flexible and “obedient” body that will help you easily master new sets of exercises in various directions...
- for fighters, for example, to perform kicking techniques (for example, high-kick (kick to the head), etc.)
- to improve *nt*m*th life, new poses are all to do =)
- and so on. in general, there are a lot of directions.
But! Let’s not fan the air with stories about how this is useful, everyone needs it, etc.
Everyone makes their own choice, whether a person wants to study - ok, no - it’s his choice. 
How to do stretching correctly?
Always follow the simple rules below, and everything will be fine =)
1. Before stretching muscles (it doesn’t matter whether it’s the legs or other parts of the body (back, chest, arms, neck, etc.), in mandatory Warm up before your workout.
This is vitally important so that you do not harm yourself or get injured (sprain or something else), because the body is “cold”, and muscles and ligaments stretch on a cold body very poorly, therefore injuries are inevitable. Do you need it?...

If you are doing anaerobic training ( Gym, training with iron), then stretching should be performed after training (not at the beginning, as some individuals mistakenly do, but only at the end, after strength training).
This is done specifically because stretching helps to relax and relieve tension from the muscles. Accordingly, if you put it at the beginning of the training, before strength training, where mobilization of forces is required, you will only worsen your strength results.
2. Perform absolutely all stretching exercises smoothly, under control, without any sudden, thoughtless movements/jerks that can lead to injury (even to a warmed muscle).
3. While performing this or that exercise, try not to strain your muscles, because relaxed muscles stretch much better (more efficiently).
4. When doing stretching exercises, always make sure that your back (namely, the spine) is straight (you cannot bend or bend, because this reduces the flexibility and elasticity of the muscles and ligaments).

5.Breathing should be as calm and even as possible (starting position - inhale (nose), stretch - exhale (mouth)) - watch this (and in no case, do not hold your breath while performing this or that exercise, this not allowed).
6.As a rule, the time to complete one exercise is about 60 seconds.
Well, in general, it varies depending on the flexibility of your muscles (at first, as much as you can, usually 5-10 maximum 15 seconds, however, each time (gradually) you need to try to increase it to the required minute or more depending on your fitness level).
7. Get into the habit of exercising (training) regularly (and not when you feel like it/want, once a week or month... because the effect of such training is like milk from a goat). I would definitely recommend starting with at least three regular workouts a week (less will not be enough), and gradually (under control, depending on how you feel) increase to daily training (if you want), no, even 3 times will be enough.

8. What else can I say... oh yes, under no circumstances should you copy someone.
Don’t try to stand out by showing off how cool I am, etc.
Always stretch in a way that suits you, not someone else.
Always consider your personal stretching limits, otherwise injury is inevitable. The game is not worth the candle...
9.If you are stretching with a partner, be very attentive and let him know how you feel. I don't argue that stretching together is more fun, but be very careful and speak up immediately if you feel too much, because your partner cannot feel when your thigh is about to tear... (this is just an example, get the point).

10. A very common mistake many people make is that they pull ligaments, not muscles! Ligaments are strong and almost inextensible membranes of the joints.
It is quite difficult to break them, but with due diligence it is possible.
As a result, you will have to undergo long-term rehabilitation, or completely forget about training.
Therefore, always take basic precautions, namely:
- Bend your knees slightly as you pull your hamstrings;
- When working on stretching your legs, relieve lateral stress on your knees by turning your toes up;
- Just be careful when stretching small arm muscles or vulnerable shoulder muscles;
- Don't let the strong pain when performing flexibility exercises.

11. Many people do stretching in such a painful way that they simply cannot stand it and quit this activity. This is not the right approach!
Under no circumstances should you endure pain, because this is the direct and shortest path to a hospital bed.
However, stretching should not be too pleasant if you want to get serious results in the foreseeable future. Do you understand?
In general, no severe pain, but don’t just fool around...
12. The body should be stretched symmetrically, paying equal attention to each limb or half of the body. If you stretch your right leg for 5 minutes, be so kind as to stretch your left leg for the same amount. Nothing less.
Only in this case can you count on the benefits of stretching exercises.

13. A reasonable duration of flexibility training is considered to be at least 30-50 minutes, no less. More is possible, but not less (although at the initial stage I spent 15-20 minutes, gradually reaching 30 minutes, I never do more than 30 minutes, because there is no need - those who are seriously involved in this, who want to achieve serious results, have a need). results).
When should you not stretch?
There are practically no contraindications for muscle stretching, so anyone can do it.
However, it is not recommended to perform various exercises to stretch any part of the body if:
- Severe spinal injuries;
- Inflamed hip joints;
- Sore lower back;
- For bruised legs;
- In case of cracks in bones, especially the pelvis;
- With high blood pressure.
- Exercises during pregnancy, according to experts, are not prohibited, however, the physiological changes that occur in a woman’s body during this period require special attention... therefore, be vigilant (look at how you feel).
- And also, in no case should you practice stretching on a cold body (without warming up), I have already talked about this in detail above.

P.s. Ideally, if you have significant health problems (especially with joints and muscles), you should consult a doctor or an experienced trainer before starting stretching exercises.
In case you were doing stretching and you experienced the following symptoms:
- Dizziness
- Muscle spasm
- Unexplained crunching or clicking in the body
Then see for yourself how you feel, maybe you need to rest for 5 minutes, maybe change the exercise, maybe stop training altogether...
Types of stretch marks
There are five types of stretching:
Active - the practitioner himself makes efforts to stretch one or another part of the body.

Passive - these are movements performed with the help of a partner (work in pairs).

With this type of stretching, the amplitude is greater than with independent work However, the training has one subtlety: if you don’t hold out, then there will be no effect from the exercise, and if you overextend, you can get injured. It is for this reason that you:
- You must be absolutely confident in your partner’s competence;
- Constantly inform him (while performing this or that exercise) about your feelings, so as not to get injured.
In my opinion, this is a kind of metamorphosis of static stretching, which is performed not under one’s own weight, but under the influence of a partner’s efforts. That's all the differences.
Dynamic - unlike static, this type is performed in motion.
The simplest example is lunges with one leg forward (backward), to the side.
 An increase in the range of motion is achieved by increasing the speed or intensity of the exercise.
Ballistic - in short, this type is performed with jerks and springy actions (prohibited for health stretching).

In detail, the basis of ballistic stretching is jumping, pushing and other sudden power movements that help stretch the muscles.
Please note that all exercises are performed with maximum amplitude and sharply (the only type in which the exercises are performed not smoothly, under control, but sharply), due to which a jerky traumatic stretch of muscle and connective tissue occurs.
During such a load, joints and muscles experience risky overloads, so this method is not widely used (as far as I know, it is not recommended for beginners).
Statistical is the most effective type of stretching recommended by doctors. In this type of stretching, a certain pose is assumed in which all muscles are stretched to the maximum, after which the body position is fixed for 15-30 seconds (maximum 1 minute).
 P.s. In general, the fixation time depends on the flexibility (stretch) of a particular person. In my opinion, in essence, all these types can be divided into two types (statistical (holding) and dynamic (in motion). Why reinvent the wheel, who knows.
Conclusion: The ballistic type of stretching is the most traumatic, because, as already mentioned, it includes various swings and springing movements with a large amplitude...
Accordingly, if your muscles and joints are not properly prepared, this can lead not to stretching, but to rupture of ligaments, muscle injuries, “knocking out” of the joint, etc....
That is why, for most people, I would recommend starting stretching training only with static, smooth exercises.
In the future, as you become more trained (experience, experience, etc.), see for yourself.
The best stretches for all parts of the body
 Do not forget that only after a thorough warm-up can you move on to basic exercises that develop the flexibility of any part of the body. As a rule, you need to start a stretching workout with stretching the neck muscles, then move on to the shoulders, back, arms, chest and abs, and only lastly do stretching exercises for the legs. This is just for your reference, so that you are aware)), but don’t worry, I’ve already compiled everything for you below, just start repeating.
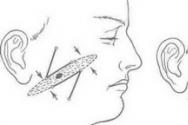
Neck
Exercise No. 1.

- The exercise can be performed either standing or sitting (in my opinion, standing is more convenient).
- Head tilts are performed using the hands: the free hand is simply extended along the body (in our example, the right one), the working hand (in our example, the left one) performs a movement, namely: with your left hand, carefully pull your head down towards your shoulder.
- After which, simply hold this position for as long as you can, and then move to the other side.
- Repeat a couple of times on each side.

Exercise No. 2.

- Stand up straight.
- Place both palms on the back of your head.
- Lightly pressing them on your head, pull your chin towards your chest.
- Stay in this position and feel the stretch in the back of your neck (see Figure 1 below).

Shoulders, back, chest
Exercise No. 1.

- The exercise is performed standing.
- Stand with your feet shoulder-width apart and raise your right arm up.
- Then pull it above your head close to your ear. Grab your right elbow with your left hand and gently pull your hand towards your ear. You should feel tension in your deltoids (shoulders).
- When you feel it, stay in this position for as long as you can.
- Repeat with the other hand.
Exercise No. 2.

- Stand straight with your feet shoulder-width apart.
- Place both arms behind your back so that your elbows are bent at a 90-degree angle (see the picture above).
- Grab your arm with your other hand as close to the elbow as you can and pull it gently across your back to your opposite shoulder.
- Hold the stretch as long as you can, and then stretch with your other arm.
Back
Exercise No. 1.

- Grab a post or pole with one hand and lean back, straightening your legs, so that your back muscles stretch.
- Hold for as long as you can, feel the stretch (burning) in this position, then repeat the exercise with the other hand (see the picture above, you’ll roughly understand what we’re talking about).
Hands and wrists
Exercise No. 1. Stretching the triceps (and even the shoulders and back)

- Starting position: standing, feet shoulder-width apart (for convenience).
- First, throw (raise) one arm (let's say the right one) back behind your back and bend it at the elbow.
- Now we pull up the second hand (left), that is, we take the right elbow with our left hand and begin to pull it carefully, slowly, under control, as far (deeper) as possible.
- Hold the stretch for as long as you can, and then repeat the exercise with the other arm.
Exercise No. 2. Stretch the biceps

- Kneel on the floor and place your hands down in front of you, fingers pointing towards your knees.
- The thighs almost touch the feet.
- Arch your back and lean back slowly, keeping your elbows motionless and your palms on the floor under control, so that tension (stretch) occurs in the muscles we need.
- Stay in this position (when it burns) for as long as you can.
- Then relax for 15-20 seconds and repeat the exercise several times (depending on how you feel).
Pectoral muscles
Exercise No. 1. Stretching the pectoral muscles on the counter

- Find some kind of support (vertical), such as a wall (as shown in the picture above).
- Go to the wall and place your hand on the wall or any other vertical surface (depending on what you find) and bend your elbow 90 degrees while leaning forward with your whole body and slightly to the side of your hand until you feel the tension in your pectoral muscles.
- Then hold this position for as long as you can (to stretch your chest muscles), and then repeat the exercise on the other side.
Exercise No. 2.

- Stand in a vertical position and pull your outstretched arms back, while keeping them in the lock (as shown in the figure below).
- After which, not sharply, but with a controlled movement (if you can, of course), raise your arms to the ceiling (as long as you can, according to your health); it is important to keep your arms straight during all this until you feel a stretch in the pectoral muscles.
Press
Exercise No. 1.

- Lie on your stomach and place both hands on the floor directly in front of you (as if you were about to do push-ups).
- P.s. I use my fists (I have a wrist injury), but you can use your hands (see for yourself).
- Lift your head and chest off the floor, slowly and carefully arching your back. Feel the stretch in your abs and hold this position for as long as you can.
- Then rest and repeat several times.
Exercise No. 2. 
- Starting position: standing, feet shoulder-width apart.
- Place one hand on your waist (as shown in the picture above) and tilt your torso to that side, while reaching for your hand.
- Then repeat on the other side.
Legs
Exercise No. 1.

- Sit on the floor. Legs widely spaced.
- Start tilting your torso forward as low as possible, then do springy tilts up and down.
Exercise No. 2.

- Sit on the floor with your legs spread wide apart.
- Bend towards your right leg as low as possible. Use your hands to hold your leg below the knee.
- Do springy tilts up and down at least 10 times. (you can go up to 50).
- Return to the starting position and repeat with the other leg.
Exercise No. 3.

- Sit on the floor. The legs are shifted and extended forward.
- We bend our torso as low as possible, trying to reach our ankles with our hands. If this is difficult, you can bend your knees slightly.
- We make smooth springy tilts up and down at least 10 times (up to 50). Your goal is to touch your head to your knees.
Exercise No. 4. It’s like doing the splits :)

- Move your feet apart from each other until you feel the tension in the leg muscles of the inner thighs during the stretching exercise (the final pose of the legs is in the form of an obtuse angle, approximately 120-140?).
- Tilt your body down, place your elbows on the floor (or try to reach for it, but not jerkily, but slowly). Stay still (hold, feel the tension) for 5-10-15-30 seconds (depending on your degree of flexibility).
- Every day, try to place your feet further apart, increasing the time of immobility in all intermediate poses.
Exercise No. 5. to stretch the back of the leg muscles (similar to a lunge).

- Stand on a hard surface with your body straight.
- Move your left leg forward (and your right leg back) as far away from you as possible.
- Bend it at the knee, lowering yourself down. Keep your back straight, feeling the stretching of the leg muscles during the exercise, stop in such a position that the angle of your bent right knee is 90 degrees.
- Relax your core - let the weight of your body be distributed downward, increasing the pressure on your legs. We stand still for as long as we can (as usual, no more than 1 minute).
- You can try to put your hands together in a “lock” behind your back (honestly, this is very difficult for beginners, so you can just put your hands on your hip or on the floor, or you can even hold on to the handrail with them/lean against the wall (if you can’t keep your balance).
- Repeat everything on your left leg.
Exercise No. 6. Side Lunges
 Lunge to the right side, with the toe of your left foot facing forward (or at a slight angle outward) and your entire foot on the floor, your left leg straight. Stretch (lower) feeling the tension. The same must be done to the left side.
Exercise No. 7. Forward bends

- Place your feet shoulder-width apart.
- With your legs completely straight (don't bend your knees at all, watch this, that's the point of the movement) perform 12 springy forward bends.
Exercise No. 8. Stretching the groin, inner thighs

- Sit on the floor, then press your feet together.
- Hold your feet with your palms.
- Place your elbows on your knees (see picture).
- Begin to slowly press your elbows on your legs and at the same time tilt your torso forward (in principle, you can simply press on your legs so that they spread and keep your torso straight, see for yourself).
- In any case, make sure that your back is straight at all times.
- Bend over as you exhale, and, having reached the peak of tension, stay in this position for as long as you can (in the future, up to 1 minute). Then return to the starting position and repeat these bends several more times (depending on how you feel).
Exercise No. 9. Hamstring stretch

- Sit on the floor. Straighten both legs in front of you.
- Start to reach your toes with your hands (or even further if you can), feeling the tension in the back of your thighs and hold for as long as you can (up to 1 minute).
- Repeat the exercise several times (depending on how you feel).
Exercise No. 10. Stretch the front of the thigh (quadriceps)

- Stand up straight, bend one knee and press your heel into your buttock with one or both hands (as shown in the photo).
- If necessary, help yourself with your opposite hand to maintain your balance.
- Make sure your knees are in line and your inner thighs are tightly squeezed.
- Tighten your gluteal muscles and twist your pelvis slightly forward and upward - this will enhance the sensation. Stay in this position for as long as you can (no more than 1 minute), feeling the tension in the front of your thigh (quadriceps).
- Repeat all over again with the other leg.
Exercise No. 11. Stretch your hips and buttocks

- Lie on the floor with your back down. Bend both legs at the knees.
- The upper body is completely relaxed.
- Raise your left leg onto your right knee (as shown in the photo).
- Place both hands on your right knee and begin to slowly, under control, pull it toward you.
- Change the relative positions of your legs and repeat the exercise.
Exercises No. 12. Ankle stretch (calf, calf)

- Stand facing the wall, then press your palms against the wall.
- Take one leg back 40 - 60 cm without lifting your heel from the floor (if you do tear it off, then press it to the floor in order to feel the tension in your ankle and calves. Otherwise (if you don’t press your heel), the exercise loses its meaning.
- Only when the heel is pressed do you feel a burning sensation (tension), only in this case does stretching occur. In general, press your heel and stay in this position for as long as you can (up to 1 minute).
Reading time: 35 min
If you want to minimize the harm from a sedentary lifestyle, get rid of back pain and feel free and relaxed, then stretch your entire body at least once a week.
We offer you a universal set of exercises for stretching all muscle groups, which is suitable for both beginners and experienced practitioners.
The benefits of stretching + exercise rules
Below is a ready-made set of stretching exercises that you need to perform 1-2 times a week if you want to keep your body healthy and mobile.
10 important reasons to stretch:
- Relief from stiffness and stiffness in muscles and joints.
- Prevent muscle shortening.
- Improving the elasticity of muscles, ligaments and tendons.
- Prevention and relief from spinal problems.
- Improving posture and getting rid of stooping.
- Improved flexibility and coordination of movements.
- Relief from muscle fatigue.
- Reduces the risk of injury and sprains.
- Psychological adaptation to physical activity.
- Reduce stress and increase vitality.
The structure of this stretching workout:
- Joint gymnastics(5-6 minutes). Be sure to do joint exercises before stretching. If you plan to stretch after an active workout, then you can skip the joint exercises and go straight to stretching.
- Stretching exercises(25-30 minutes). All the exercises suggested below are static, that is, you take a pose and stay in it for 30 seconds, stretching the muscles. If you want to shorten the stretching time to 15 minutes, then hold each pose for 15 seconds. If you want to extend the length of your stretch to 40 minutes, hold each pose for 45 seconds.
Duration of stretching exercises:
- 30 seconds in each pose => total duration stretching ~25 minutes
- 45 seconds in each pose => total workout duration ~35 minutes
- 15 seconds in each pose => total stretch duration ~12 minutes
How often to perform a set of stretching exercises:
- For active trainees: Once a week for 30 minutes(in addition to regular short stretching after exercise)
- For people leading a sedentary lifestyle: 2 times a week for 30 minutes
- For people who want to improve their stretching and flexibility, as well as relieve back pain or improve their posture: 3-4 times a week for 30 minutes
- For people who practice yoga on a regular basis, additional stretching exercises may not be necessary.
Rules for performing stretching exercises:
- All proposed stretching exercises are static (except for joint gymnastics). To perform them, you need to take a given pose and stretch the muscles in one position.
- Remember to do stretching exercises on both the right and left sides.
- You can always deepen the position or, conversely, simplify the stretching exercise a little by choosing a more comfortable position. Listen to your body!
- Exercise without sneakers, barefoot or in socks. Additionally you will need (preferably non-slip).
- If some stretching exercise gives you severe discomfort (not discomfort from stretching the muscles, but, for example, pinching, cramping or pain), then it is better to stop doing this exercise.
- Hold each pose for 30 seconds on each side (in which case the total stretch duration will be 25 minutes) or 15 seconds on each side (in this case the total stretch duration will be less than 15 minutes).
- It is advisable to use a timer to track the duration of the static pose. Take a look.
If you don't have mobile application with a timer, then use a ready-made video with a sound signal every 30 seconds:
Check out our ready-made workouts for beginners:
Joint gymnastics: 10 exercises
Why do you need joint gymnastics? Joint exercises improve blood circulation and warm up the muscles of the whole body, which is especially important before performing a set of stretching exercises, since stretching on an unstretched body is unsafe. In addition, exercises from joint gymnastics warm up and develop joints, making them more mobile.
If you plan to do stretching exercises after an active workout, then in principle you can skip joint exercises. If your workout begins with stretching, then before stretching you must perform joint exercises.
Our joint gymnastics includes 10 exercises. Perform each exercise for 30 seconds without resting between exercises if you are training on a timer. Or count the number of repetitions if you train without a timer.
Stand straight, hands on your waist. Start tilting your head: right - forward - left - forward. Perform this exercise at a slow pace, without making sudden jerks with your head.
How many: 10 turns to the right and 10 turns to the left or 30 seconds.

Bend your elbows in front of you and clench your palms into a fist. Start rotating your hands in a circle, stretching your wrists well. Rotate first in one direction, then in the opposite direction (clockwise and counterclockwise).
How many:

Leave your palms folded into a fist and spread your arms out to the sides. Start rotating your forearms, stretching your elbow joints. Rotate first in one direction, then in the opposite direction.
How many: 10 rotations in each direction (20 rotations total) or 15 seconds per rotation in one direction (30 seconds total per exercise).

Let's move on to warming up the shoulders. Lower your arms along your body and begin to rotate your shoulders, trying to describe the maximum circle with them. Rotate your shoulders first forward, then back.
How many: 10 rotations in each direction (20 rotations total) or 15 seconds per rotation in one direction (30 seconds total per exercise).

Stay in the same position and begin to rotate your arms with maximum amplitude. Rotate your arms first forward, then back.
How many: 10 rotations in each direction (20 rotations total) or 15 seconds per rotation in one direction (30 seconds total per exercise).

6. Body tilts
Let's move on to warming up the core. Place your hands on your belt and begin to bend, first in one direction, then in the other.
How many: 10 bends in each direction (20 bends in total) or 30 seconds per exercise.

Leave your hands on your waist and begin to rotate your pelvis in a circle. Stretch your buttocks, thighs and stomach. Don't forget to rotate first in one direction, then in the opposite direction.
How many:
10 rotations in each direction (20 rotations total) or 15 seconds per rotation in one direction (30 seconds total per exercise).
8. Hip Rotation
Let's work the hip joints. Hands are on the belt. Raise your knee and begin to rotate your leg. First, rotate your right foot (one way, then the other way). Then rotate your left leg (one way, then the other way).
How many: 8 rotations in each direction (a total of 16 rotations on each leg) or 15 seconds per rotation in each direction (30 seconds on one leg or 60 seconds on both legs).

9. Knee rotation
Place your feet together, bend your body and place your hands on your knees. Start rotating your knees, warming up your knee joints.
How many: 10 rotations in each direction (20 rotations in total) or 15 seconds on each side (30 seconds for the entire exercise).

10. Rotate your feet
Place your hands on your waist again and lift your knee. Start rotating your foot, stretching your ankle joint. Remember to rotate to one side and the other on each leg.
How many: 10 rotations in each direction (total of 20 rotations on each leg) or 15 seconds per rotation in each direction (30 seconds on one leg or 60 seconds on both legs).

Stretching workout: 30 exercises
After joint gymnastics, you can move on to stretching training. We perform the exercises sequentially one after another. If an exercise is difficult for you or causes real discomfort, skip it.
Don't forget to do the exercise on the right and left sides! Those. if the exercise involves performing it on the right and left sides, then hold for 30 seconds on each side.
For what: We begin our set of stretching exercises with a very simple exercise that will help us perfectly stretch the muscles of the arms, shoulders and core.
How to do it: Stand straight, stomach tucked, legs slightly apart. Raise your arms up and cross your palms above your head. Bend to the side, squeezing your shoulder blades together and keeping your arms overhead. Hold the bend, stretching the muscles throughout your upper body.

For what: This simple exercise to stretch your hamstrings, hamstrings, and glutes can be done not only on a separate stretch day, but also after each workout.
How to do it: Stand straight, bend your knees slightly. Place one leg half a meter forward, resting on your heel, and fully straighten it. Bend your back straight, place your hands on the knees of your front leg or on your waist. The lower the inclination, the better the muscles and tendons are stretched. Stay in a comfortable position, you can gradually deepen the stretch.

For what: This stretching exercise benefits your entire upper body and the back of your legs. But first of all, it is good to perform it to stretch the pectoral muscles, open the chest and shoulder joints.
How to do it: Stand up straight, bring your arms back and cross your palms behind your back. Begin to slowly tilt your body, moving your arms back and raising them up. At the end point, your body should be parallel to the floor, your arms pointing vertically upward, and your chest open. You can bend your knees a little, since in this exercise it is not so important for us to stretch the legs (below there will be enough exercises for stretching the lower body).

For what: Triangle pose strengthens and stretches the muscles of the hips and buttocks, is an excellent stretch for the hamstrings, opens the shoulders and thoracic spine, and also relieves pain in the lumbar region.
How to do it: Spread your legs wide, right foot facing to the side, left foot forward. Both legs are straight. Stretch your arms to the sides parallel to the floor, tighten your stomach. Tilt your body towards your right leg and turn it so that your right hand rests on your right shin, your left hand looks up. You can bend your right leg slightly at the knee if you find it difficult to keep your legs straight. Turn your head, direct your gaze to the fingers of your left hand. If you feel discomfort in your neck, keep your head in a neutral position.

For what: This exercise stretches the triceps, the muscle that usually gets the most stress during exercise.
How to do it: Stand straight with your feet slightly apart. Raise your bent arm and place your elbow behind your head. With your other hand, apply gentle pressure to your elbow, lowering your arm and increasing the stretch. The palm of the stretched hand seems to move down the shoulder blade.

For what: This exercise is great for strengthening and stretching the muscles of the lower body, especially the glutes and adductors (inner thighs).
How to do it: Spread your legs wide, knees pointing to the side. Lower your pelvis down into a squat position. Hips parallel to the floor. Place your hands on your hips and tilt your body slightly, keeping your back straight. Avoid arching or arching your lower back to create tension in this area.

7. Half-split bend
For what: The floor bend strengthens and stretches the glutes, hamstrings, hamstrings, hip adductors, and back extensors. This exercise is very useful to practice for longitudinal splits, as well as for mastering the “fold”.
How to do it: Spread your legs wide, they are fully straightened and do not bend at the knees. Bend your body with a straight back, place your hands on the floor. Don't slouch your back, bring your shoulder blades together. You can spread your legs even wider and place your forearms on the floor if stretching allows.

For what: The garland pose not only opens the hip joints and stretches the muscles of the legs and buttocks, but also helps improve blood circulation in the pelvic organs. This exercise also relieves tension in the lumbar spine.
How to do it: Stand straight with your feet shoulder-width apart. Do deep squat without lifting your heels off the floor. Spread your knees to the side and lean your body slightly forward. Place your palms together near your chest, and with your elbows apart, press lightly on your knees, trying to push your hips apart.

For what: This is one of best exercises to stretch the back, back of the legs and hamstrings. Also, bending towards the floor perfectly relaxes and calms the mind.
How to do it: Stand straight with your feet close to each other. Tilt your body so that your stomach rests on your thighs. Hands free and down, try to reach the floor with your fingertips. If you can't reach the floor, clasp your shins with your hands. In this stretching exercise, it is very important not to hunch your back and pull your stomach towards your hips. Do not make jerking movements with your back, trying to reach the floor at all costs - there is a risk of injuring your back.

For what: The side lunge will help you stretch your glutes and leg muscles, so we always recommend doing this exercise after your leg workout.
How to do it: Spread your legs wide and bend your right leg at the knee, transferring your body weight to it. The thigh of the right leg should be at least parallel to the floor (you can lower it even deeper), the knee does not go forward of the toe. The left leg remains straight. Feel the tension and stretch in your leg muscles. You can stretch your arms out in front of you or place them on the floor.

11. Lunge with arms up
For what: The lunge is one of the most accessible and effective exercises to stretch your legs and buttocks. Anyone can do it and it can be performed in almost any conditions. Even, for example, after running outside to stretch your muscles.
How to do it: Stand straight with your feet wide apart and your right foot in front. Lower your pelvis down and bend your front leg at the knee so that a right angle forms between your thigh and shin. The back left leg remains fully straight and tight, without relaxing it at the knee. Raise your arms above your head, stretch the top of your head up. At the same time, try to lower your pelvis lower to the floor, stretching the muscles of your legs and buttocks even better.

For what: This stretching exercise involves almost every muscle in your body. You will stretch the muscles of your arms and shoulders, pectoral muscles, abdominal muscles, as well as the muscles of the thighs and buttocks due to the lunge position.
How to do it: Stay in a lunge position with your right foot forward. Lower your pelvis a little lower towards the floor. Lower your left hand to the floor and turn your body to the right so that your chest is fully open and your left arm is reaching up. Direct your gaze to the fingers of your left hand. This is a very popular and effective stretching exercise that is ideal for both beginners and intermediates.

How to do it: We continue to do leg stretching exercises, without changing sides. Maintaining a lunge position, place your knee on the floor. You can place a towel or pillow under your knee if you have a thin mat. The thigh of the front leg remains parallel to the floor and perpendicular to the shin. Move the knee of your back leg back a little, lowering your pelvis down and deepening the stretch. Feel the stretch in your leg muscles.

For what: This is an in-depth position of the previous stretching exercise to work the leg muscles even more effectively. The legs contain the largest muscles in our body, so special attention should be paid to stretching them.
How to do it: Stay in a deep lunge position with your knee flat on the floor. Lift the shin of your left leg up and pull it with your left hand to your thigh so that your foot is as close to your buttocks as possible. Perform this exercise as gently as possible, without jerking, so as not to pull the leg muscles. If you find it difficult to hold a lunge with a leg grab, then skip this exercise.

For what: This is one of the best exercises to stretch the hamstrings and hamstrings. Practice this exercise regularly if you want to do the splits.
How to do it: From a lunge position, fully straighten your front leg. Bend slightly towards your leg, placing your hands on the mat on both sides of your outstretched leg. With your knee fully extended, pull your toes toward you to further stretch your hamstring. The back is completely straight, do not round it.
If stretching allows, place your body on your outstretched leg.

For what: Pigeon pose increases hip flexibility and stretches the glutes, quadriceps, and hip adductors.
How to do it: Return to lunge position. Gently lower your right shin to the floor and rotate your hip so that your foot is under the left side of your pelvis. Hind leg remains straight, pull your pelvis towards the floor. In this exercise, it is very important to fix the position of the pelvis: it remains stable and does not fall to the side. To do this, make sure that the pelvic bones are directed forward. If you can’t straighten the position, place a pillow under your buttocks.

For what: Camel pose is perfect exercise to relieve tension in the cervical spine and upper back.
How to do it: Kneel down, feet hip-width apart, back straight, shins of both legs on the floor. Place your hands on your waist and pull your elbows back. Bend slightly back, arching your back and maintaining a right angle between your thigh and shin. Bring your shoulder blades together, open your thoracic spine. Tilt your head back without twisting or straining your neck.
If flexibility allows, increase the arch and lower your hands to your feet.

For what: Downward-facing dog pose not only stretches the muscles of the arms, shoulders, back, buttocks and legs, but also has a beneficial effect on your posture and spine. This exercise also relieves tension throughout the body; it is very useful to perform it after a long stay on your feet.
How to do it: Get into a hand plank position. Lift your pelvis up, straightening your arms and legs, head down. Your body and legs seem to form a slide. Please note that the back remains absolutely straight. Since this is a fairly complex yoga pose and requires good stretching, we will simplify it a little by bending the legs at the knees. You can also lift your heels off the floor.
If you have a good stretch, then straighten your legs completely and place your feet on the floor.

For what: And another great exercise for stretching and getting rid of spinal problems. Upward-facing dog pose relieves back pain, opens the chest, improves the elasticity of the lungs, and increases blood circulation in the pelvic area. We'll make this stretch a little easier by lowering our lower body onto the mat.
How to do it: Lie face down on the floor. Bend your elbows, place your palms under your shoulders. Lift your body up, arching your back and leaning on your hands. The legs remain on the floor. Pull your shoulders back and down, bring your shoulder blades together, do not strain your neck or throw your head back. Hold the upward-facing dog position, feeling a pleasant stretch in your spine.

For what: Sphinx pose gently stretches the thoracic and lumbar spine. This is an ideal exercise for improving posture and opening the chest.
How to do it: Lie on your stomach, place your palms on the mat near your chest. Using your forearms, arch your back and lift your upper body. Remove your shoulders from your ears, distribute the deflection evenly between the thoracic and lumbar spine (middle and lower sections). If you feel tension in your lower back, reduce the arch.

For what: The lotus pose in yoga is primarily aimed at relaxation and relaxation; it has a calming effect. Also in the lotus position, you will thoroughly stretch the buttocks, adductor muscles of the thigh and lower leg muscles, and open the hip joints. By bending, you will further stretch your back muscles and.
How to do it: Sit on the floor, straighten your spine, stretch your head up. First pull your right leg towards you, then your left, folding them crossed in front of you. Knees and hips lie on the floor. Find a comfortable position, but it is important that your back remains straight. Extend your arms in front of you and tilt your body slightly, also stretching your back. Don't slouch, stretch your stomach towards the floor. Don’t forget to repeat the exercise on the other side, pulling your left leg towards you first, then your right.

If your body flexibility allows, you can lean on your forearms, increasing the stretch:

For what: The butterfly pose is a great stretch for the legs, opens and relaxes the hip joints, and improves blood circulation in the pelvic organs and lower back. Butterfly pose is especially useful for those who have a sedentary or sedentary lifestyle.
How to do it: In our set of stretching exercises, we offer a simplified version of this pose, since the original butterfly pose can only be done by people with good stretching. Sit up straight and bend your knees. Spread your legs so that your knees are on the floor and your feet are together. Place your hands on your shins and pull your feet closer to your pelvis. The back remains straight. If you can’t straighten your back, then move your feet away from you.

If your body flexibility allows, you can tilt your body forward, also stretching your back muscles:

For what: The fold is one of the most useful exercises to stretch the hamstrings and hamstrings. The fold will be very useful for those who want to improve stretching and do the longitudinal splits.
How to do it: In our stretching routine, we will perform a simple modification of the fold without bending too much. Sit on the floor with your legs fully straight and your hands on your hips. Begin to lean your body forward, trying to lie with your stomach on your thighs. Stretch your arms forward, trying to reach your toes. In this exercise, it is very important not to slouch your back, but to stretch your stomach towards your hips. You cannot round your back when bending over or perform jerking movements trying to make a fold. Doing this can damage your back and cause pain in your spine.
If stretching allows, bend your body completely towards your legs, grasping your feet.

For what: This simple exercise will help you stretch the muscles of your buttocks, calves, and hamstrings.
How to do it: Sit on the floor, stretch your legs in front of you. Pull your right leg towards you and turn it to the side so that your shin is parallel to your chest. Grab your foot with your left hand and pull your shin as close to you as possible with your right hand. Don't hunch your back. Repeat the exercise on the right and left leg.

For what: This simple stretch is ideal for relieving tension in your back and lower back. This exercise will also help you stretch your gluteal muscles.
How to do it: Sit on the floor with your legs extended in front of you. Bend your right leg at the knee and move it to the side over your left thigh. The left leg remains straight and lies on the floor. Turn your body to the right, your left hand lies on the knee of your bent leg, your right hand rests on the floor. Don't forget to repeat on the other side.

For what: This is one of the best exercises for relaxing the back, relieving tension in the lumbar region and preventing spinal diseases.
How to do it: Lie on your back, spread your arms to the sides. Extend your right leg to the left side through your hip, twisting your back and trying to touch your knee to the floor. You can help yourself with your hand, lightly pressing on your right leg so that it drops lower. Turn your head to the right. The right arm remains extended to the side. Don't forget to repeat on the other side.

For what: This is a great exercise for stretching your glutes, back of your legs, and hamstrings. This simple stretching exercise is also great for relaxing the lumbar spine.
How to do it: Lie on your back, bend your knees. Raise one leg up and grab it by the shin, trying to pull it closer to your chest. The raised leg remains fully extended. If you have a good stretch, you can straighten your other leg by placing it on the mat. Be sure to repeat the stretch on both legs.

For what: This is one of the best exercises to stretch your buttocks while lying down. This exercise also helps relieve tension in the lower back.
How to do it: Lie on your back, knees bent, lower back pressed firmly to the floor. Raise your legs up so that the shin of your left leg rests on the thigh of your right leg. Grasp the thigh of your right leg with your hands and pull it closer to your stomach. Feel the stretch in your buttocks, hamstrings, and lower back. Repeat the same on the other leg.

For what: Happy Child's Pose opens the hip joints, relaxes the back and lower back muscles, and strengthens the leg muscles. This is one of the best exercises to relax the body.
How to do it: Lie on your back, press your lower back to the floor, legs bent at the knees. Pull your knees toward your chest and grab your feet (either the outside or the inside) with your hands. Spread your knees wider and lower your hips even lower. Take a comfortable position; you can sway slightly from side to side. Incorporate the happy child's pose into your stretching routine if you want to forget about lower back pain.

For what: Wind pose is one of the best exercises for relieving tension in the back, lower back and neck. In addition, the wind pose provides a gentle massage of the abdominal organs, improves the flexibility of the spine, and stretches the gluteal muscles.
How to do it: Lie on your back, stomach tucked, legs bent at the knees. Draw your knees toward your chest, lifting your head and shoulders off the floor. Grab your knees with your hands. Feel a pleasant relaxation in your back. This simple exercise is great for stretching and relaxation after intense exercise.

For what: Child's pose can end any workout as it is one of the best exercises for relaxation and relaxation. Child's pose also helps lengthen the spine and relieve tension in the cervical, thoracic and lumbar spine.
How to do it: Sit on your knees bent, buttocks resting on your feet, legs spread apart. Lower your body to the floor and extend your arms forward. Take a comfortable position and relax. Feel a pleasant stretch in your back muscles. Close your eyes and remain in Child's Pose until you feel fully recovered from your exertion.

It doesn’t matter why you needed to do the splits - for showiness for a special occasion, perfect stretching or health benefits (yes, her splits also bring, and quite a lot). Whatever you have in mind, know that doing the splits is actually not that difficult. If you regularly perform several effective exercises, even more so.
1. Bends with hands “clasped” behind your back
Stretching, which is usually painful and therefore not very pleasant, is best started with a simple and slightly relaxing exercise, such as this one. It will stretch the muscles of the back of the thighs well and, as a bonus, improve the flexibility of the back, straighten the shoulders and chest.
How to do it. Stand straight with your feet shoulder-width apart. Bring your hands together behind your back, lock them together and lift them up - your back should arch. In this position, bend over and pull your chest towards your hips. Keep your legs straight, they should not bend at the knees. After standing like this for 5 breaths, slowly return to the starting position.
2. Bends to one leg
Do it very carefully. The “pull” will be under the knee and lower back, but then the splits will become a couple of centimeters closer.

How to do it. Sit on the floor and stretch your legs. Bend your right knee and place it on your side, thereby opening your hips halfway. Strive to touch the outside of your left foot with your right hand, and try to place your torso on a straight leg. Pull your left hand forward, too, towards your foot. Relax your shoulders - they should not rise. Stay in this position until you take 5 breaths. Raise your body, change legs, repeat the exercise.
3. Bend forward with legs open
It will not be possible to lie down with your body on the floor in this position right away. But when it does work out, it will mean that there is nothing left before the twine (and not longitudinal, but transverse).

How to do it. Sit down and spread your legs to the sides, but not to the maximum width. Move your pelvis forward a little, but be careful not to let your legs move with it. Straighten your back. Move your body forward towards the floor until you feel a “burning” under your knees - this is the tendons stretching. Stay in the lowest position for 5 breaths, then return to the starting position.
4. Deep lunges forward
What could be simpler and more convenient than stretching the leg muscles in such a lunge? In addition, this exercise is even too good for stretching.

How to do it. Lunge forward with your right foot. Place your hands on the floor. The leg should be between them. Place your left knee on the floor. If you can, lower yourself onto your elbows. Press your body against your right leg. Stretch your hips towards the floor. Stay as low as possible while you take 5 breaths. Switch legs and repeat the exercise.
5. Deep lunge with calf raise
Having worked on stretching the knees, let's move on to the hips, or more precisely, to the muscles of their back and front surfaces.

How to do it. Go to the wall, stop a step away from it, turn your back to it. Get on your knees. Place your right leg bent at a right angle forward. Lift the foot of your left leg up and “put it” on the wall. Pull your hips down until you feel a stretch in the muscles. Place your hands on your knee to keep your position stable. Keep your back straight. Stay in this position while you take 5 breaths, then relax, switch legs and repeat.
6. Standing Power Stretch
Stretch your muscles with the force of your arms - this can be more effective than putting pressure on them with your own weight.

How to do it. Stand straight, close your feet. Shift your weight to your left leg, and lift your right leg, bent at the knee so that it is easy to grab it with both hands. Stand straight on your left leg. Slowly straighten your right leg to the side, holding your big toe with your hand. If this comes easily to you, pull your hip towards your stomach, lifting your foot towards the ceiling. Hold this position for 5 breaths. Slowly lower your right leg to the floor. Switch legs and repeat the exercise.
7. Side plank stretch
To stretch in such a precarious (in the literal sense of the word) position, you need to be able to maintain balance. Despite the complexity, this exercise is worth trying - it significantly lengthens some muscles, while giving others a static load.

How to do it. Get into a side plank position with your arm extended and your right leg supported. Carefully, while maintaining balance, grab the big toe of your left foot with your left hand and, bending your leg at the knee, pull it up, gradually straightening it. Stand while trying not to lose your balance. If you can, straighten your leg and pull it as high as possible. After 5 breaths, gently release your left leg, place it on the floor, and assume a sitting position. Switch sides and repeat the exercise.
Hello my readers! We have all heard many times that there are 2 types of training - strength and cardio. Each of them has its own advantages, limitations and results. But rarely does anyone remember that for harmonious physical development, body flexibility is also necessary. You say “Why?” And you’ll even most likely think that exercises for body flexibility for beginners are still difficult and you don’t need it. But today I will try to convince you.
The famous Bruce Lee once said: “Even the strongest tree is easier to break than bamboo or willow shoots bending in the wind.” No matter how much you do strength training, no matter how much you do, you will not be able to achieve grace and smooth movements without flexibility.
In addition, this is also useful because:
- Helps
- Improves blood supply to muscles and starts recovery processes
- Develops coordination and endurance
- Has a positive effect on the back muscles and spine
Well, in the end, remember how many jokes there are on the Internet, intended for men, with pictures of girls who bend well. Many men in their fantasies allow themselves to dream that their life partner has a wonderful stretch mark.
Myths about stretching
Myth 1. You need innate abilities. Of course, for professional athletes they should be, but if you do not plan to perform in the circus, then your muscles are quite ready to perform simple complexes trainings. And each time you will feel that you are able to bend a little more.
Myth 2. You need to do such training from childhood, and they are definitely not available after 30. Yes, it’s easier for children, they really have greater joint mobility. But the advantage of stretching is that it can be done at any age. You just need to do it gradually, without trying.
Myth 3. Flexibility exercises are always painful. Also a misconception. In no case should it be brought to the point of pain; you need to stretch to the point of tension.
Myth 4. Such training will not give you. Perhaps the effect will not be as pronounced as in the case of cardio training, but such training is also exercise stress, because during its execution energy is spent, and the body works. This means calories are also wasted.
Such different workouts
There are a whole bunch of different types of stretching workouts. But in general, there are only 2 types of stretching training.
Dynamic, with the performance of various amplitude movements (swings, rolls). With each movement, the amplitude should increase due to inertia. Contraindicated for beginners, as it is quite traumatic.
Static. This is where you need to start training. There are no sudden jerks. It is necessary to stretch the muscles and lock in this position for 20-30 seconds to a minute. This way the muscle works smoothly. In turn, static exercises can be divided into active (independent exercise, stretching occurs under the weight of your own body) and passive (when a trainer helps).

No matter how unrealistic and difficult it may seem, flexibility exercises are also available at home. You should only
- Be sure to warm up before class. The body needs to be warmed up and the waste paper needs to be prepared for work. Jog at a calm pace for 5-7 minutes and do simple bends, squats and swings
- Avoid harshness. Remember, you are not in school physical education. All movements must be smooth. Feel how your body works
- Don't do anything through pain. The state of tension and overcoming is normal, but pain is not. Pain can lead to injury and tissue rupture
- Exercise regularly. Otherwise, your joints will lose mobility again
- Don't expect tremendous results from stretching in 2 weeks. The main thing here is not speed, but quality of execution. For example, only after 3-4 months of regular exercise can you do the splits
- After 1.5-2 months of doing the same exercise, your muscles begin to get used to the load. Try to complicate it or start doing a different complex
- Consult a trainer before starting training. If you don’t want to do this, at least watch detailed videos on the Internet and study in pictures which muscles should work during this or that training.
Exercises for Beginners
We passed the introductory part. Now you are ready to start your workout. Below I will give a few simple exercises that can be used to create a good workout.
- Exercise for the back “Cat”. Standing on all fours, gently arch your back up, then also smoothly bend it down. Lock each end position

Stretch your buttocks
We lie on our back, leave one leg bent at the knee, and pull the other to the chest, keeping it as straight as possible.
 Sit on the floor, bend one leg, try to lean forward towards the other leg.

Calf muscles
While standing, lunge forward with one leg and bend it at the knee. Make sure your feet are pressed to the floor.

Anterior thigh
While standing, bend one leg at the knee, clasping it with your hand, pull your leg towards your buttock.

Rib cage
- Join your hands behind your back and lift the lock up
- Standing, back straight, raise your arms up in the lock and stretch

Lateral thigh
From a sitting position, bend one leg at the knee and move the other to the side. Bend to the side.

Press
Lying on your stomach, place your hands on the floor and lift your upper body.

For the first lessons, these exercises will be quite enough. Gradually you need to increase the amplitude, load and introduce more complex stretches. And don’t forget: no sudden movements! Throughout the entire session, control your breathing; it should be smooth and deep. You should enjoy your actions, then you will be not only in excellent physical shape, but also psychologically!
Subscribe to me and tell your friends about my site. Bye bye!
In contact with
Body flexibility is the dream of millions of people. Almost everyone wants to be flexible, flexible, strong. They dream of doing the splits and almost tying themselves in a knot.
But few people think about simple questions:
How to properly stretch muscles?
Which muscles should you stretch and which should you not? (Yes, yes. There are muscles, stretching which disrupts the balance in the body and leads to health problems.)
Are they ready to pay the right price for what they want? Are you ready to spend all this time and effort?
How to combine strength training and stretching? And to what extent should you stretch so that the results of many years of strength training do not suffer?
There are a lot of these questions...
Timely answers to these questions will allow you to avoid many, sometimes very annoying mistakes. Some of these mistakes can easily put an end to your sports career and even harm your health. Let's look at the most serious of them.
Flexibility Mistake #1
Expecting results too quickly
You often see promises like “splits in a month, splits in 10 workouts, splits in a week.” And the requests on the Internet are generally amusing: “cross splits in one day”!
If you are naturally quite flexible, it may take up to two months to get the splits without losing your health or damaging your joints.
Most people find it difficult to even take the starting position to perform the necessary exercises. That is, they have to stretch their muscles just to start stretching their muscles properly!
For ordinary person, not gifted with natural flexibility, a period of six months is quite realistic to do the longitudinal splits. Cross twine may require more time. Moreover, you will need to train at least 4-5 times a week for 30-50 minutes.
Forcing exercises, violating reasonable requirements, artificially increasing flexibility with the use of excessive loads can result in disability or result in extremely unpleasant delayed consequences. Especially in old age.
Be patient, developing flexibility takes time.
Flexibility Mistake #2
Stretching the wrong muscles
A very common mistake! How many backs have been hurt! Pull exactly the muscles you want to stretch. Don't strain your back extensors or overextend your hip joints, especially if you're doing strength training. Overstretched muscles are unable to maintain the desired balance and support the joints. Especially under load. Hence the injuries and contortions.
Under no circumstances should you pull your fingers.
Error 3
Stretching not only muscles, but also ligaments
It is the muscles that should be pulled, not the ligaments. Ligaments are strong and almost inextensible membranes of the joints. It is quite difficult to break them, but with due diligence it is possible. As a result, you will have to undergo long-term rehabilitation, or completely forget about training. The knee joints are especially vulnerable. Be sure to follow basic precautions:
Bend your knees slightly when pulling your hamstrings.
Have a clear idea of why you want to develop flexibility. And exactly what kind of flexibility do you need, in what location? Are you willing to pay an adequate price for this result in the form of time and significant effort?
Never experience too much pain during flexibility training. This is a recipe for injury, which will definitely set you back in your training for several months, or even prevent you from developing flexibility altogether.