Full length drawing of an angel. Drawing an angel of love: how to draw cupid
Drawing is a pleasant process. It's always fun to create using pencils and paints. The choice of tools depends on your preferences. We will tell you how to draw Cupid. This process is very interesting and exciting. The main thing is to follow all the steps one by one. This is the only way you will be satisfied with the result.
Who is Cupid?
Cupid is an ancient Roman god, the personification of love and passion. Previously, the angel was depicted in the guise of a young handsome guy. Aphrodite chose this young man for the role of her companion and faithful assistant. Later, Cupid began to be depicted as a little angel. His attributes were a bow with magic arrows of love. At first glance, this character looks quite simple, but in order to depict it on paper, you will have to make an effort. In this article we will tell you how to draw Cupid step by step.
Drawing technique
Even if you don’t have an artist’s education, don’t be upset. You need to remember that any drawing consists of geometric shapes, and thanks to this knowledge, it will be much easier to cope with the technique. The image starts with an oval or circle. If you know how to draw these, success is guaranteed.
So, the roundness will serve as sketches on paper; for this it is better to choose a pencil of medium hardness. When applying figures, do not press hard on the tool. Before you start drawing, practice on a rough draft. Over time, you will understand how to draw Cupid correctly.
In order for the hero to gain a colored look, it is better to use paints or they are easy to use. Before moving on to coloring, remove any excess sketch lines.
Steps to Draw Cupid
In fact, there is nothing complicated in drawing an angel of love, you will have the opportunity to see this. Let's consider several options step by step drawing Cupid.
Freehand draw as much as possible smooth circle and lines that will make it easier for you to draw the nose and eyes. It should be as even as possible, because, as we know, angels are plump characters. Cupid drawn in pencil always looks attractive.
In order to make drawing the body easier, you need to draw an oval under the circle; it should be slightly uneven and overlap the head area. The lower part of the geometric figure needs to be rounded more.

The next step is sketches for the hands. The limb consists of three parts (upper arm, forearm and hand). You need to draw three ovals for each. See the picture provided for more details.

You also need to sketch out the legs. It is worth noting that parts of the buttocks are depicted as ovals, larger than the calf parts.
Now comes the more exciting part of the drawing. We draw parts of the face. The eyes should be large, a button nose, a gentle smile and curls. The cheeks and chin should be drawn with auxiliary lines. More details are in the figure.

We outline the contours of the body, drawing bends in the elbows, knees, and buttocks. Draw fingers on the arms and legs. and onions, you can see in the picture.
At this stage, you need to remove all unnecessary lines in the drawing and color the cupid.
You should not use bright shades to color the angel. The hero should be gentle and light. Use pastel colors.

The direction and poses of the angel can be changed according to your wishes. The most important thing is to correctly sketch the ovals for the location of the arms and legs. Now you know how to draw Cupid.
DIY cute cupid
IN Greek mythology the god of love was called Cupid, and the Romans called theirs Cupid.
Consider the following option for drawing a character. Unlike the previous example, this one is easier to complete.
Draw a circle with lines for the eyes, nose and mouth. Draw the lines of the head. The next stage is drawing the body and hands of the angel. Then we draw the bow.

We draw wings and other parts for the angel.

Let’s finish drawing a bow and arrow for our cupid. This is what our hero looks like when completed. You can decorate it if you wish. Now you have learned another version of creating a cute boy with a bow and you know how to draw a cupid.

Other options for depicting angels
Many girls wonder about Hai. Cupid is also among these heroines. Portraying a girl with pink hair is not difficult.

And in the pictures below, you can see examples of step-by-step drawing of cupids for Valentine's Day. It can be used for holiday cards for your loved one.

This version of the Cupid image is more complex; drawing it will require a lot of patience, care and practice. Over time, you will be able to depict boys with wings behind their backs with your eyes closed. Use a variety of techniques and tools for your creativity.
On the eve of the most important holiday - Christmas, a pressing topic is how to draw an angel.
By learning to depict mythical creatures, you can get as close as possible to the amazing and mysterious world.
How to draw an angel. Step by step lesson: No. 1
In this article we will look at 2 lessons on drawing gentle and at the same time sublime angels.
1. According to tradition, the general outline of the figure should be drawn in the center of the sheet
2. At the top of the triangle in the form of an oval, outline the head
3. Let's start with the upper part of the figure: showing the shoulders and chest
4. Then we draw a skirt, because the angel will be in a female form. How to draw a mermaid
5. Having decided to draw a mysterious entity, we decide the question: “How to draw an angel more believably?” Everyone has their own ideas and the drawing will be purely individual. The next step is to draw the hands of an angel
6. Having finished with the main points of articulation of the arms, do not forget about the legs
7. The time has come for the most interesting part - we draw wings for the angel. They are huge, full height
8. If we see an angel, then he appears according to the flesh. We draw his hands and thin figure
9. Let's move on to the angel's face. Let it be a pretty young girl with long hair
10. We draw in more detail the details of a kind face, big eyes, a soft half-smile, strands of hair
11. Using bold lines, we indicate folds in clothing, adding volume to the skirt
12. Painstakingly and carefully draw the feathers on the angel’s wings. They are small at the top, long and thin at the bottom.
13. Draw a halo over the angel’s head
14. Using shading we achieve the effect of volume and life
15. To complete the image, all that remains is to use an eraser to show the highlights on the angel’s hair, clothes and wings
Having been patient and having figured out the problem of how to draw an angel, every artist seems to touch the world of magic and the unknown.
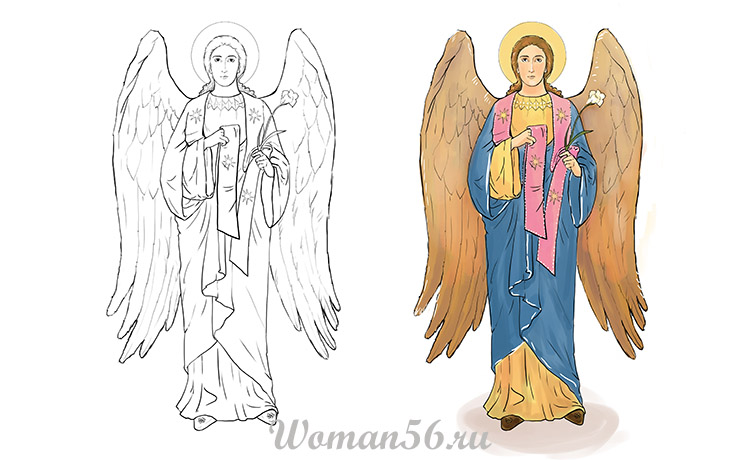
How to draw an angel. Step-by-step lesson: No. 2
According to the Christian religion, angels have an external resemblance to people. This will help with learning step by step lesson"How to draw an angel."
1. Using horizontal and vertical lines, we indicate the outline of the drawing

2. Using an oval we outline the place of the head, the contour of the figure

3. In mirror image, draw two large angel wings

4. We outline the hands with dots and lines

5. Let's start with the details of the costume in the upper part

6. Carefully draw the face: eyes, nose, mouth, and hair

7. Finish drawing the robe

8. Main feature the angel's wings are: all feathers should be drawn very carefully

9. Let’s draw a symbol of his holiness above the angel’s head - a halo

10. Let’s start decorating clothes with patterns and ornaments. Let's draw a flower in our hands

11. When thinking about how to draw an angel in color, we start with the hair

12. Paint clothes with delicate shades of blue and light brown

13. Dye a long scarf with pale pink color

14. Paint the angel’s wings brown

15. Using highlights on clothes, wings and hair, we add volume and airiness to the picture
Attention to detail and patience will help you quickly understand all the features of this lesson.
Angels are creatures invisible to humans, whose main function is to transmit to people God's will. After all, we ourselves are not able to feel and see what God wants; for this we need some intermediaries, in the role of which the angels act. These creatures protect and protect us and our children from evil forces and from everything bad. This is why drawings of angels are so popular; many use them as avatars, send them to their friends as gifts, and decorate school diaries.
On the Internet you can find a huge number of different pictures with angels depicted. These are carefree innocent little children, and evil angels in the form of demons, and bright guardian angels, and warrior-defenders, and many others. For animation fans, there is a wide variety of animated angels. By drawing such wonderful pictures, you can immerse yourself in a wonderful Magic world fairy tales where miracles happen.
The drawing of an angel with wings can be different - it can depict a cute child with wings, a woman of unearthly beauty who looks like an angel, or a man who personifies masculinity and heroism.
There is no person who would be uncomfortable admiring such cute creatures, because somehow, when looking at them, we are filled with positive emotions, our mood rises, we feel a surge of strength and energy, and a desire to create appears. So let's create a real little masterpiece on paper.
So, how to draw an angel?
It’s very simple, let’s figure it out. Basics distinctive features any angels - a rather large head and eyes, the mandatory presence of wings, hair, clothes, and it is also desirable to have a halo above the head. In order to learn how to create drawings of an angel on your own, let’s first try to draw a beautiful angel girl. For this we only need a pencil and a piece of paper.
We proceed according to simple steps:
· First of all, we draw a large circle, which acts as a head, and draw a line on the face.
· Below the resulting circle, draw the silhouette of the body.
· We will give the head the shape of the face, and also try to depict the contours of the future hairstyle.
· On the face we draw round eyes, quite large in size.
· Next in line are the eyebrows, as well as the small mouth.
· Next we move on to the body. We draw the elements starting from the top and gradually moving down.
· The neck should be in the form of a small line.
· Our angel’s legs will converge in one place and are shaped like a spear.
· Don't forget to add an angel with wings to your drawing.
· Then we dress our beauty - a few touches similar to the frame of the dress.
· For every angel, an indispensable element are wings, the shape of which can be chosen to suit your taste. There can be as many feathers at the end of the wings as you like - it all depends on your imagination.
· All that remains is to finish beautifully drawing our girl’s hair and erase the unnecessary ones with an eraser auxiliary lines, which we drew at the very beginning.
 Having drawn the angels with a pencil, you can decorate the drawings in any way convenient for you. Feel free to involve your kids in creativity; they will certainly get maximum pleasure from this activity. IN You can also add hand-drawn angels.
SELECTION OF IDEAS


Drawings of angels can often be found in children's books or on postcards. There are a huge number of options for angels: a baby angel, a “cartoon” angel, for example, a character from the cartoon “Angel Friends,” an anime angel, a character with a human face who came down from heaven, etc. therefore, before you learn how to draw an angel step by step, you need to decide what kind of character you should get. And also in what technique will you draw it: pencil, paints or some other.
How to draw an angel step by step
Drawing an angel with a pencil step by step is not so difficult. Just follow these instructions:


- In the central part of the sheet, draw the general outline of the figure of the future angel.
- At the top, outline the head in the form of an oval.
- Below we sketch the upper body (shoulders, chest).
- Below we finish drawing the long skirt.
- Making sketches of the angel's hands.
- Below we draw the legs.
- From the shoulder we draw wings that will be the full height of our angel.
- Draw the arms and waist.
- At the next stage we draw the hair and facial features: large eyes, a smile.
- To give the clothes volume, we mark folds on them.
- The wings deserve special attention. Carefully draw all the feathers. At the top they will be small, and at the bottom they will be thin and long.
- Draw a halo above the head.
- Using shading, we give the drawing volume and realism to the image.
- At the final stage, we add highlights to the angel’s clothes and hair. To do this, you can use an eraser.

Drawing an angel with a child
You can also involve your child in the process by drawing a child angel with him. For this:
- Draw an oval face. But in this case, it will be upside down. Make funny ears on the side. Schematically draw the details of the face: eyes, nose, mouth. Add hair and a thin neck.
- The next stage is drawing the body. To do this, just draw long dress bell-shaped with wide sleeves. This will be the basis.
- Now it's time for the details. Draw wings behind the back, arms that will be visible from the sleeves and a halo at the top.
- To make the little angel more realistic, draw the feathers on the wings and folds on the clothes.
Angel for beginners
If you cannot call yourself a professional, but still decide to draw an angel, use these instructions that even a child can do:
- Draw a circle on the stick (like a flower). Inside this circle there will be 2 lines that will become a sketch of the angel’s future body. In place of the ball we will draw a head, and from the stems we will make a body. To guide where you need to draw the lips and eyes, draw horizontal lines in a circle.
- Draw the outline of the hair. On your forehead, make bangs that will look like teeth. Half-bent arms will come from the bottom of the circle.
- In the next step draw the fingers and wings. At the end of each of them there should be 3-4 feathers.
- We will depict the dress in the shape of a trapezoid with a wavy bottom edge.
- A halo is drawn above the head.
- On the face we draw the eyes, mouth and neat nose. To draw them, follow the marks.
- All that remains is to correct the drawing by wiping off all the excess.


Video instruction
If you have been wanting to draw an angel for a long time, but don’t know where to start, we are ready to help you. So today you will learn how to draw an angel. You must remember that an angel is a fictional creature, so many details may be made up by you. It is also worth understanding that today there are many different pictures of angels that are perfect for sketching.
How to correctly portray an angel.
Where to start an angel. We recommend that before you start drawing, find a picture that will serve as a model for sketching. It needs to be firmly secured. Then carefully study the entire composition and estimate approximately how many solid lines you will need to make and which elements should be emphasized. So, we invite you to draw an angel in the guise of a person. This is quite a difficult task, and if you are not an experienced artist, then we recommend that you choose the easier option. If you complete all our simple tips and follow the instructions carefully, you will succeed. so where to start. This is the head. 
The head is always the most difficult part. In any course like how to draw an angel step by step, there is always a section that is entirely devoted to the head. It is worth understanding that today angels are depicted quite often. In order for your painting to be truly impressive, you need to study several nuances. So, we recommend that you start with your head. To do this, you will need to draw a circle and only after that you can draw facial features. If you don’t understand how to draw a circle, then it’s better to copy from a finished painting. It is very important that the lines are smooth. Solid contours can be applied only at the final stage of the drawing. Remember this.
So, it's also worth noting that great importance may have a center face. This is necessary, because if you do not determine the center of the face, it will be difficult to create a symmetrical face. You will learn how to draw an angel with a pencil right now. So, you should have a set of at least 2 pencils on hand. It should be a soft and hard pencil. Carefully examine the density of the pencil. It is very important. If you are drawing an angel in the guise of a girl, then we advise you to focus on the angel's hairstyle. 
How to draw an angel's face and maintain proportions.
We have already mentioned that an angel by nature is a gentle and weightless creature. It's worth understanding this. therefore, if we talk about hairstyle, it is better to depict an angel girl with loose hair that smoothly flows onto her chest. Trust our experience - this is the best option. It is important to consider some nuances. It is also worth noting that drawing an angel is not an easy task, but if you try, you will be able to correctly depict this beautiful creature. I would like to say a few words about the angel's facial features. Eyes should be expressive and beautiful. The angel's eyes have eyelashes and are usually depicted as wide open. You can also focus on your eyebrows. An angel girl is always pure in her essence, so you can depict her with an averted gaze. You will learn how to draw an angel with a pencil step by step after a while. 
Read our recommendations carefully, and drawing a beautiful angel will not be difficult for you. We have already noted that the angel should be drawn only with smooth lines. It is worth understanding that today, there are many different interpretations that depict angels.
We are drawing an angel in the guise of a beautiful girl; after the head is drawn with strokes, we can smoothly move on to the body. We advise you to draw the neck. It will be smooth and expressionless. This needs to be done so that the emphasis remains on the face. After this, draw the line of the shoulders. It is worth understanding that all the lines that are present in the drawing should be slightly blurred. This is important for the overall composition and character of the drawing. If you strive to convey lightness and beauty at the same time, then the chest line should be drawn smoothly and emphasized with light spots. You must decide on the girl's attire. Let it be like a dress. You can also view the course on how to draw angel friends.
How to draw several angels at once.
Angels are often depicted in groups. You must understand that today there are quite a lot of compositions and paintings that depict angels. We recommend that you carefully choose the subject for your work of art. Sometimes it is difficult to paint a picture even in a few days. This is why we recommend that you place accents correctly and start drawing with a simple composition. If you are interested in how to draw an angel and a demon, we are ready to help you.  These are two opposite images and therefore there should be a clear contrast in your painting. If you paint in paints, then it is better to choose black and white, or rather milky tones. It is also worth noting that an angel and a demon are fundamental images and therefore their depiction may take a long time. We always remind you that beautiful picture- this is a lot of work. It is especially important when depicting an angel to depict its wings. This is its component.
How to draw angel wings.
You should also consider that the wings must have light transitions. It is important. To do this, we advise you to use a simple eraser. You already know how to draw an angel RAF. If you have problems with the image of an angel's chest, then we recommend that you draw it like a little mermaid. An angel is a special being. it should combine purity and lightness. the most important thing that you must understand is that in the image of an angel you need to avoid hard lines.
We have informed you of all the nuances that you may encounter when painting a picture that depicts an angel. A drawn angel picture will help you learn how to draw.
You take it first a simple picture without complex and intricate elements. The penultimate step should be the detailing of the drawing. This is very important point. you must take into account all the features of the composition and smoothly connect all the elements of the picture. It is worth understanding that the wings can be copied from a swan. If you can, it’s better to carefully draw one layer of feathers on the wings. It is also important to maintain proportions. You can also add feather strokes. This way they will turn out expressive and natural. The angel is a work of art. You must portray his character correctly and try to keep the lines smooth. We want to wish you more creative ideas and successful implementation of them.